D Using Remote Server
Sooner-or-later you are in a situation where you have to work on a distant networked computer. There are many reasons for this, either your laptop is to weak for certain tasks, or certain data is not allowed to be taken out from where it is, or you are expected to use the same computer as your teammates. Or maybe you want to set up a website and your laptop, obviously, travels around with you instead of staying in one place with reliable internet connection all the time. The server you use may be a standalone box located in a rack in your employer’s server room, or it may be a virtual machine in a cloud like Amazon EC2. You may also want to set up your own server, or your own virtual machine.
D.1 Server Setup
There are many ways one can set up a distant machine. It may be Windows or linux (or any of the other unixes). It may or may not have graphical user interface (GUI) installed or otherwise accessible (many unix programs can display nice windows on your laptop while still running on the server). It may or may not have RStudio available over web browser. Here we discuss a barebone option with no access to GUI and no web access to RStudio. We assume this server is already set up for you and do not discuss installation here.
This is a fairly common setup, for instance when dealing with sensitive data, in organizations where computer skills and sysadmin’s time is limited, or when you rent your own cheap but limited server (graphical user interface takes a lot of memory).
D.2 Connecting to the Remote Server
Given the server is already running, your first task is to connect to it. Here it means that you will enter commands on your laptop, but those command are actually run on the server.
The most common way to connect to remote server is via ssh. ssh stands for “secure shell” and means that all communication between you and the remote computer is encrypted. You connect to the server as
ssh is nowadays pretty much the industry standard for such connections, it comes pre-installed on macs and it is included with gitbash too.
When you ssh to the remote server, it asks for your password and opens remote shell connection. If this is your first time to connect from this particular laptop, you may also be asked to accept it’s fingerprint. This is an additional security measure to ensure that you are actually talking to the computer you think you are talking to.
The remote machine will offer you a similar bash shell environment as you are using on your computer but most likely you see a different prompt, one that contains the server’s name. You may also see some login messages. Now all the commands you are issuing are running on the remote machine. Sopwd shows your working
directory on the server, which in general is not the same as on the
local machine, and ls shows the files on the server, not on your
laptop. Now you can use mkdir to create the project folder on the
server.
Note: when entering your password, it usually does not print anything in response, not even asterisks. It feels as if your keyboard is not working. But it is working, and when you finish and press enter, you will be logged in.
By default, ssh attempts to login with your local username. If your username on the server differs from that on your laptop, you want to add it to the ssh command:
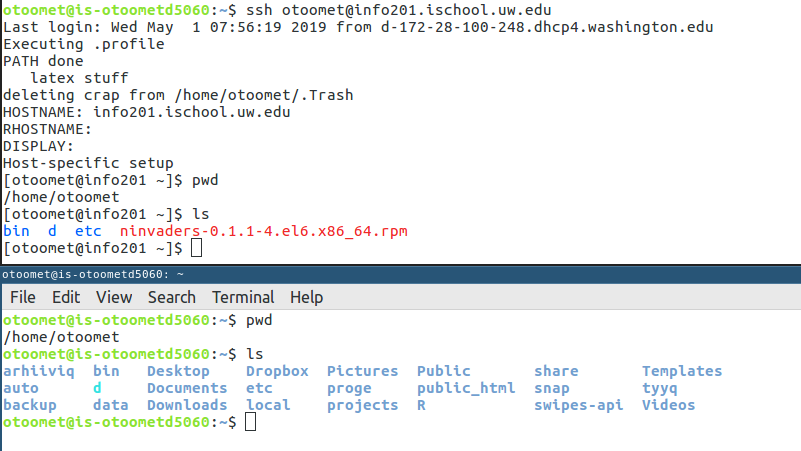
Local and remote shell window
The screenshot above shows two command line windows, the upper one connecting remotely on info201, and the lower one running locally at a computer called is-otoometd5060. In the upper one, you can see the login command ssh otoomet@info201.ischool.uw.edu and various start-up messages. The pwd command shows the current working directory being /home/otoomet, and ls shows there are for objects there. Below, we are on the local computer is-otoometd5060. Current working directory has the same name, but on the local computer it contains rather more entries.
Finally, when done, you want to get out. The polite way to close the connection is with command
that waits until all open connections are safely closed. But usually you can as well just close the terminal.
D.3 Copying Files
Before you can run your R scripts, or build a website on the server, you have to get your code and data copied over. There are several possibilities.
D.3.1 scp
The most straightforward approach is scp, secure copy. It comes pre-installed on mac and gitbash and it works in a similar fashion as cp for the local files, just scp can copy
files between your machine and a remote computer. Under the hood it uses ssh
connection, just like ssh command itself, so the bad guys out there cannot easily see what you are doing. It syntax is rather
similar to that of cp:
This copies “file1” from the server “host1” under username “user1” to
the other server. Passwords are asked for as needed. The “host” part
of the file must be understood as the full hostname including dots,
such as “hyak.washington.edu”. “file” is the full path to file,
relative to home directory, such as Desktop/info201/myscript.R.
When accessing local files, you may omit the “user@host:” part. So,
for instance, in order to copy your myscript.R from folder
info201 on your laptop’s Desktop to the folder scripts in
your home folder on the server, you may issue
(here we assume that the working directory of your laptop is the one above
Desktop.)
Note that exactly as with cp, you may omit the destination file name
if the destination is a directory: it simply copies the file into that
directory while preserving its name.
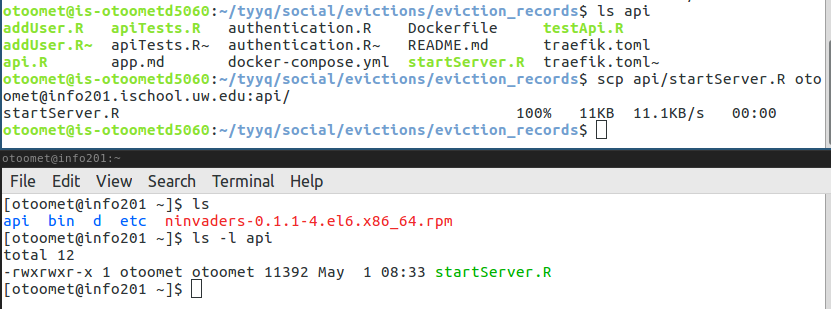
scp in action. The upper shell window, running locally, depicts scp in action, copying file startServer.R from directory api to the remote server into api directory (while retaining the same name). The lower window shows the remote machine: first, ls command shows we have an api folder in our home directory, and second ls -l api shows the content of the api directory in long form. startServer.R is copied over there.
After running your script, you may want to copy your results back to
your laptop. For instance, if you need to get the file
figure.png out of the server, you can do
As above, this copies a file from the given directory, and drops it
into the info201 folder on your Desktop.
Always issue scp command locally on your laptop. This is because your laptop can access the server but usually not the way around. In order to be connected via ssh (and scp), a computer must have public ip-address, and ssh server up and running. It is unlikely you have configured your laptop in this way.
D.3.2 rsync
rsync is a more advanced approach to scp. It works in many ways
like scp, just it is smart enough to understand which files
are updated, and copy the updated parts of the files only. It is the
recommended way for working with small updates in large files.
Its syntax is rather similar to that of scp. To copy file to the
remote server as file2 (in the home directory), we do
rsync file user2@host2:file2and in order to copy a file1 from server as local file (in the
current working directory):
rsync file user1@host1:file1 fileI also recommend to
explore some of its many options, for instance -v (verbose) reports
what it’s doing.
The example above with your code and figure might now look like that:
rsync -v Desktop/info201/myscript.R myusername@server.ischool.edu:scripts/
# now run the script on the remote machine
rsync -v myusername@server.ischool.edu:scripts/figure.pdf Desktop/info201/
Maybe the easiest way to copy your files is to copy (or rather update) the whole directories. For instance, instead of the code above, you can do
# copy all files to server:
rsync -v Desktop/info201/* myusername@server.ischool.edu:scripts/
# now run the script on the remote machine
# ... and copy the results back:
rsync -v myusername@server.ischool.edu:scripts/* Desktop/info201/
Here * means all files in this directory. Hence, instead of
copying the files individually between the computers, we just copy
all
of them. Even better, we actually do not copy but just update. Huge
files that do not change do not take any bandwidth.
D.3.3 Graphical Frontends
Instead on relying on command line tools, one can also use graphical front-ends. For instance, “WinSCP” is a nice Norton Commander-Style frontend for copying files between the local and a remote machine over scp for Windows. It provides a split window representing files on the local and the remote end, and one can move, copy-and-paste and interact with the mouse on these panes. On Mac you may take a look at “Cyberduck”.
D.3.4 Remote Editing
Besides copying your files, many text editors also offer a “remote editing” option. From the user perspective this looks as if directly working on the remote server’s hard disk. Under the hood, the files are copied back and forth with scp, rsync or one of their friends. Emacs and vi do it out-of-the box, VSCode, Atom and sublime require a plugin. AFAIK it is not possible with RStudio.
It is also possible to mount (attach) the harddisk of the remote server to your laptop as if it were a local disk. Look yourself for more information if you are interested.
D.4 R and Rscript
When your code has been transferred to the server, your next task is to
run it. But before you can do it, you may want to install the
packages you need. For instance, you may want to install the ggplot2 and dplyr. This must be done from R console using
install.packages(). You start R interactively by the command
It opens an R session, not unlike what you see inside of RStudio, just here you have no RStudio to handrail you through the session. Now all loading, saving, inspecting files, etc must be done through R commands.
The first time you do it, R complains about non-writeable system-wide library and proposes to install and create your personal libary. You should answer “yes” to these prompts. As Linux systems typically compile the packages during installations, installation is slow and you see many messages (including warnings) in the process. But it works, given that the necessary system libraries are available. You may alo open another terminal and ssh to the server from there while the packages are compiling in the other window.
Now you can finally run your R code. I strongly recommend to do it
from the directory where you intend to run the project before starting
R (cd scripts if you follow the example directory setup above). There are two options: either start R
interactively, or run it as a script.
If you do it from an interactive R session, you have to source your script:
The script will run, and the first attempt most likely ends with an error message. You have
to correct the error either on your laptop and copy the file over to
the server again, or directly on the server, and
re-run it again. Note that you don’t have to exit from the R session when
copying the files between your laptop and the server. Edit it, copy it over
from your laptop (using scp or
other tools), and just re-source the file from
within the R session. If you need an open R session on the server, you may want to have several terminals connected to the server at the same time: in one, you have the R session, in another you may want to copy/move/edit files, and it may also be handy to have a window with htop too see how your running code is doing (see below).
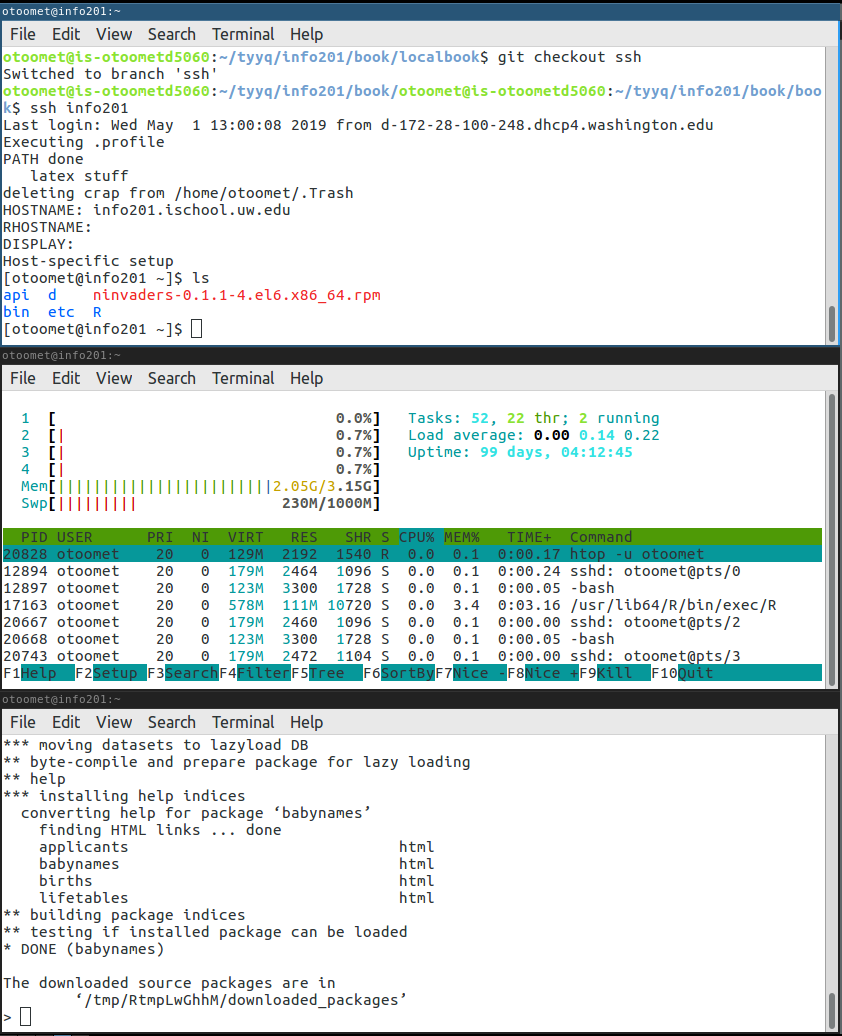
Three terminals connecting to a remote server at the same time. The top one has been used for file management, the middle one shows tha active processes by user otoomet, and the bottom one has open R session for package installations. Multiple open connections is often a convenient way to switch frequently between different tasks.
Opening a separate R session may be useful for installing packages. For running your scripts, I recommend you to run it entirely from command line, either as
or
The first version produces a little more informative error messages, the other one handles the environment in a little more consistent and efficient manner.
D.4.1 Graphics Output with No GUI
If the server does not have any graphics capabilities, you have to save your figures as files. For instance, to save the image in a pdf file, you may use the following code in your R program:
pdf(file="figure1.pdf", width=12, height=8)
    # width and height in inches
    # check also out jpeg() and png() devices.
# do your plotting here
plot(1:10, rnorm(10))
# done plotting
dev.off()
    # saves the image to disk and closes the file.
Afterwards you will have to copy the image file figure1.pdf to your laptop for future use. Note that the file will be saved in the current working directory (unless you specify another folder) for the R session. This is normally the folder where you execute the Rscript command.
Besides of pdf graphics, R can also output jpg, png, svg and other formats. Check out the corresponding devices jpeg, png, svg and so forth. Additionally, ggplot has it’s own dedicated way of saving plots using ggsave although the base R graphics devices, such as pdf will work too.
D.5 Life on Server
The servers operate the same in many ways as the command line on your own computer. However, there are a number of differences.
D.5.2 Useful Things to Do
There are several useful commands you can experiment with while on the server.
(press q to quit) tells you which programs run on the server, how much memory and cpu do
these take, and who are their owners (the corresponding users). It
also permits you to kill your misbehaving processes (press k and
select SIGKILL). Read more with man htop.
(who) prints the current logged-in users of the server.
(display free in human-readable units) shows the free and
occupied disk space. You are mainly influenced by what is going on in the file system
/home.
D.5.3 Permissions and ownership
Unix systems are very strict about ownership and permissions. You are a normal user with limited privileges. In particular, you cannot modify or delete files that you don’t own. In a similar fashion, you cannot kill processes you did not start. Feel free to attempt. It won’t work.
In case you need to do something with elevated privileges (as “superuser”), you have to contact the system administrator. In practice, their responsiveness and willingness to accommodate your requests will vary.
D.5.4 More than One Connection
It perfectly possible to log onto the server through multiple terminals at the
same time. You just open several terminals and log onto the
server from each of these. You can use one terminal to observe how your script is
doing (with htop), the other one to run the script, and the third one to inspect
output. If you find such approach useful, I recommend you to
familiarize yourself with gnu screen (command screen that includes
many related goodies.)
D.6 Advanced Usage
D.6.1 ssh keys, .ssh/config
Without further configuration, every time you open a ssh connection, you have to type your password. Instead of re-entering it over and over again—this may not be particularly secure and it is definitely not convenient—you can configure your ssh keys and copy it to the server. Next time, you will be automatically authenticated with the key and you don’t have to type the password any more. Note: this is the same ssh key that is used by GitHub if you use ssh connection to GitHub.
As the first step, you have to create the key
with ssh-keygen (you may choose an empty passphrase) unless you
already have created one. Thereafter copy
your public key to the server with ssh-copy-id. Next time you log
onto the server, no password is needed. A good source for help with creating
and managing ssh keys is
GitHub help.
You can also configure your ssh to recognize abbreviated
server names and your corresponding user names. This allows you to
connect to server with a simple command like ssh info201. This
information is stored in the file
~/.ssh/config, and should contain lines like
Host info201
    User <your username>
    Hostname info201.ischool.uw.edu
The Host keyword is followed by the abbreviated name of the server,
the following lines contain your username and the publicly visible
hostname for the server. Seek out more information if you are interested.
D.6.2 More about command line: pipes and shell patterns
bash is a powerful programming language. It is not particularly well suited to peform calculations or produce graphs, but it is excellent in glueing together other programs and their output.
One very powerful construct are pipes. These are in many ways similar to magrittr pipes in R, or perhaps we should say the other way around as shell pipes were introduced in 1973, a quarter of century before R was created. Pipes connect output of one command into input of another command. For instance, let’s take commands ls -s and head. The former lists the files (in long form) and the latter prints out a few first lines of a text file. But head is not just for printing files, it can print the first few lines of whatever you feed it. Look, for instance, the following command (actually a compound command):
ls -l creates the file listing (in long form). But instead of printing it on screen, it will now send it over pipe | to the head utility. That one will extract the first lines and print only those.
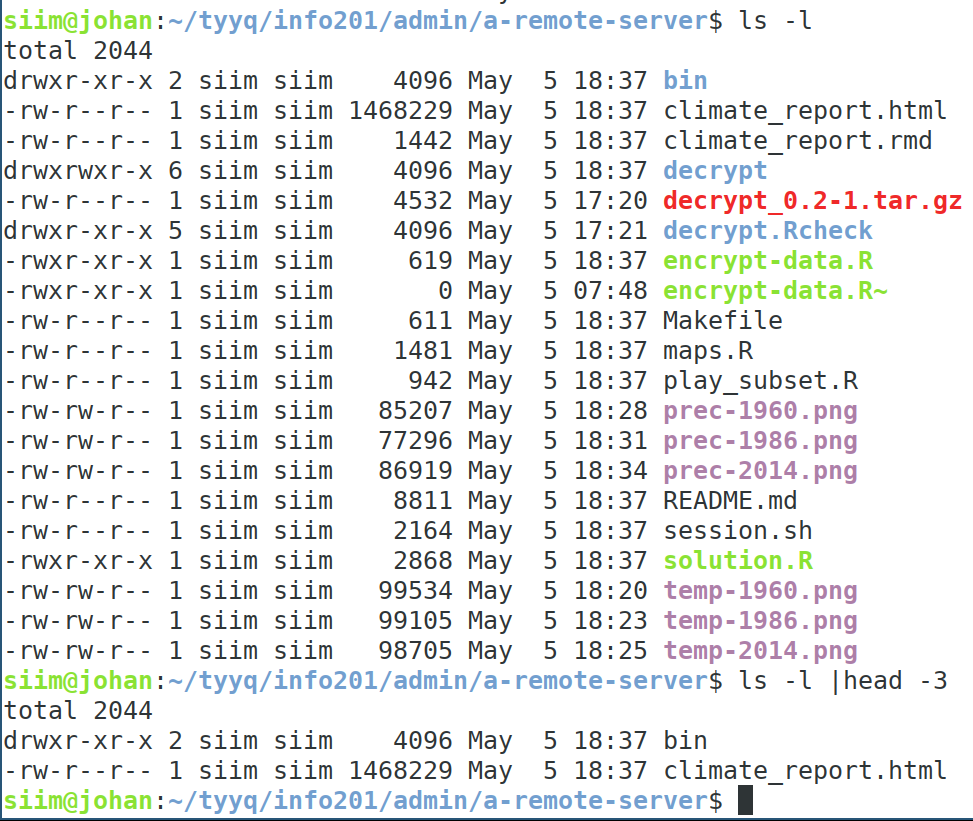
Example of ls -l command that prints a number of files (above). Below, the same command is piped through head -3 that retains only the three first lines (and prints those). Note that the first line is not a file, but a total size of files in this directory (in kilobytes).
Pipes are not limited to two commands only. You can pipe as many commands together as you with. For instance, you may want to see a few first lines in a large compressed csv file that contain the word Zilong. We use the following commands:
- bzcat prints bzip-compressed data (you normally invoke it like
bzcat file.txt). But it just prints and does not do anything else with the output. - grep searches for a pattern in text. This can be used as
grep pattern file, for instance grepsalary business-report.txt. Note that pattern is a regular expression (rather similar as in Rgsubandgrepfunctions), sogrepcan search for a wide range of patterns. However, it cannot open compressed files, and neither can it limit the output to just a few lines. - head prints first few lines of text. You can print out the first n lines of a file as
head -n file.txt, but again–this does not work with compressed files.
We pipe the commands together as
and achieve the result we want. So pipes are an excellent way to join small commands, each of which is good at only a single task, into complex compound tasks.
Another handy (albeit much less powerful) tool in shell is the shell patterns. These are a little bit like regular expressions for file names, just much simpler. There are two special characters in file names:
- * means any number of any characters. For instance,
a.*means all files likea.,a.c,a.txt,a.txt.old,a...and so on. It is just any number of any characters, including none at all, and “any” also means dots. However, the pattern does not coverba.c. - ? means a single character, so
a.?can stand fora.canda.Rbut not fora.txt.
Shell patterns are useful for file manipulations where you have quicly sort though some sort of fine name patterns. These are handled by shell and not by individual commands, so they may not work if you are not at shell prompt but running another program, such as R or a text editor.
For instance, let’s list all jpg files in the current directory:
This lists all files of patten *.jpg, i.e. everything that has .jpg at it’s end.
Now let us copy all png files from server to the current directory:
This copies all files in the form *.png from the server here, i.e. all files that end with .png.
D.6.3 Running RScript in ssh Session
Passwordless ssh connection gives you new wonderful possibilities. First, you don’t even have to log into the server explicitly. You can run a one-command ssh session on the server directly from your laptop. Namely, ssh accepts commands to be run on the remote machine. If invoked as
It does not open a remote shell but runs Rscript script.R instead.
Your command sequence for the whole process will accordingly look something like:
rsync -v Desktop/info201/* myusername@server.ischool.edu:scripts/
ssh myusername@server.ischool.edu "Rscript scripts/myscript.R"
rsync -v myusername@server.ischool.edu:scripts/* Desktop/info201/
All these command are issued on your laptop. You can also save these to a text file and run all three together as a single shell script!
Further, you don’t even need the shell. Instead, you may explain R on your laptop how to start R on the remote server over ssh. In this way you can turn your laptop and server combination into a high-performance-computing cluster! This allows you to copy the script and run it on the server directly from within your R program that runs on your laptop. Cluster computing is out of scope of this chapter, but if you are interested, look up the makePSOCKcluster() function in parallel package.